


El framework SwiftUI viene con una vista ActionSheet, en iOS 14 o inferior, para crear una action sheet. Basicamente puedes crear una action sheet de la siguiente forma:
ActionSheet(title: Text("What do you want to do"), message: nil, buttons: [.default(Text("Delete"))]Inicializas una action sheet con un título y un mensaje opcional. El parametro buttons acepta un array de botones. En el ejemplo anterior proporciona un botón por defecto llamado Delete.
Para activar un action sheet, tienes que adjuntar el modifier actionsheet a un botón o a una vista. Si miras dentro de la documentación de SwiftUI, tienes dos formas de presentar un action sheet.
Puedes controlar la apariencia de un action sheet usando el parámetro isPresented:
func actionSheet(isPresented: Binding<Bool>, content: () -> ActionSheet) -> some ViewO a través de un optional binding:
func actionSheet<T>(item: Binding<T?>, content: (T) -> ActionSheet) -> some View where T : IdentifiableLos action sheets tienen tres tipos de botones: predeterminado, destructivo y cancelar. El tipo de botón predeterminado se utiliza para acciones comunes. Un botón destructivo es similar a un botón predeterminado, pero con el color de fuente rojo para indicar acciones destructivas, como eliminar. El botón cancelar es un tipo especial para descartar la action sheet.
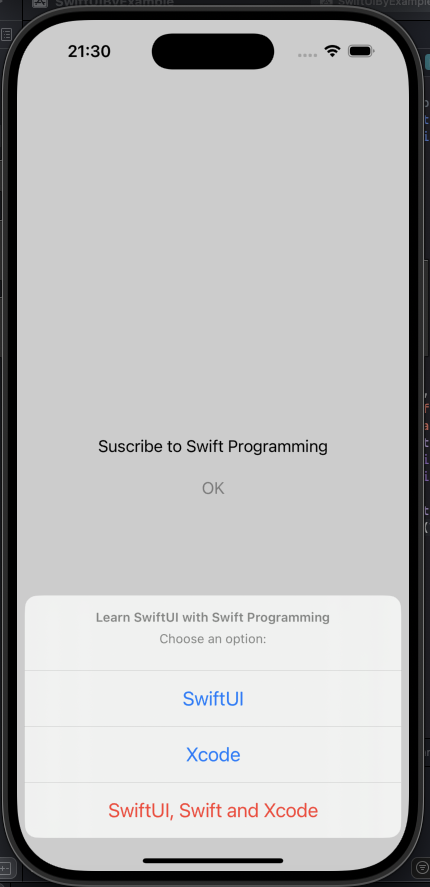
En el siguiente ejemplo:
struct ContentView: View {

    @State var isPresented: Bool = false

    var body: some View {
        Text("Suscribe to Swift Programming")
            .padding()
        Button("OK") {
            isPresented = true
        }
        .actionSheet(isPresented: $isPresented, content: {
            ActionSheet(title: Text("Learn SwiftUI with Swift Programming"),
                        message: Text("Choose an option:"),
                        buttons: [.default(Text("SwiftUI"),
                                           action: {
                                            print("SwifUI")
                                           }),
                                  .default(Text("Xcode")),
                                  .destructive(Text("SwiftUI, Swift and Xcode"))])
        })
    }
}
El resultado en XCode es el siguiente:
El componente ActionSheet permite crear una vista de selección de opciones nativa del sistema. Normalmente se usa para notificar al usuario sobre algo que ocurre en la aplicación o cuando debe tomar una decisión de aceptar o cancelar. Es un componente equivalente a UIAlertController de tipo .actionSheet de UIKit.